
- Setting up Auditing & Logging of Files/Objects Using Native Windows File Server Tools - 16th October 2020
- Designing Key Performance Indicators (KPI) - 15th July 2020
- DDOS Attacks and Website Hacking - 6th July 2020
In this article I’d like to go through how to setup auditing and logging of files/objects using native Windows File Server tools. Some of my projects over the years have had workstreams implementing security and compliance objectives of logging and auditing activities, particularly file/object access. A lot of the solutions have used CyberArk and Centrify products. Indeed, these products seem to be one of the more popular options used by enterprises (especially large scale). However, these are not the only options and in this article I’d like to discuss how to implement a solution using native Windows Server tools.
These tools aren’t at the level of detail/sophistication that a product from a company dedicated to security and audit compliance might provide. For e.g. this solution does not provide screen capture functionality. However, depending on the specific situation, this solution might suit a company’s objective for a short-term tactical solution for strengthening compliance while a strategic solution is worked on through RfPs, pilots etc. in parallel for the long term.
The process for achieving this is a simple two steps: First, setting up the audit policy on the file server. Second, setting up the auditing of the actual files/objects on the server.
In the final part of this article I will cover how to view the events being logged.
Configuring the Audit Policy
- Open the Group Policy Management Console (GPMC). The GPMC can be accessed on a workstation where Windows Server Administration Tools are installed. GPMC can be started by opening the “Run” dialog box and typing “gpmc.msc” and hitting enter.
- In the “Group Policy Management” window, shown below, select the the domain policy that you want to edit, for e.g. the default one. Right click on it and select “Edit” from the context menu to open the Windows Server’s Group Policy Management Editor (GPME).
- In the GPME, navigate to Computer Configuration > Windows Settings > Security Settings > Local Policies > Audit Policy.
- Double-click Audit Object Access and the select the “Define these policy settings” checkbox. Click the “Success” and “Failure” check boxes, based on your requirements, to start logging the successful and failed access requests for the object.
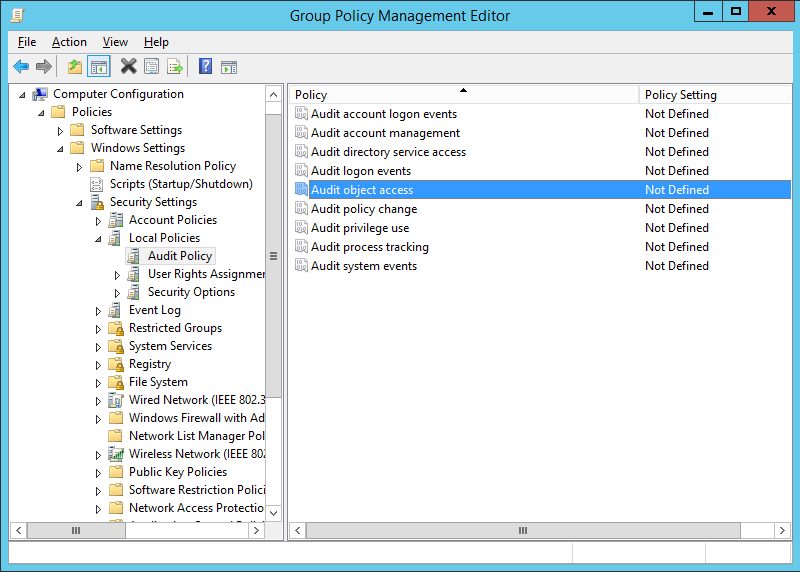
Figure 1: The Group Policy Management Editor (GPME) Window
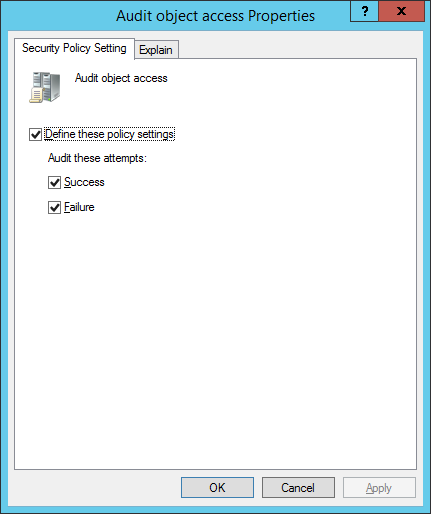
Figure 2: "Audit object access Properties" window
Configuring the logging and auditing of files/objects
- Open Windows Explorer and go to the folder that needs logging and auditing.
- Right-click the folder and select Properties > go to the Security tab and select the advanced button to open the window below.
- Click Add to open the Audit Entry for Work files window, below, and click Select a Principal to choose users whose activities need to be tracked.
- This will open another window. For most cases when implementing logging and auditing, everyone within the organisation will have to have their activities on the files/objects logged and audited, i.e. there will be no exceptions for people going un-audited. For this you can type “Everyone” in the “Enter the object name to select” dialog box and click the “Check Names” button. Then click “OK”.
- This will take you back to the Auditing Entry for Work files window. In this window, set the configuration to log both successful and failed attempts to gain access by selecting “All” in the “Type” drop down list.
- To audit all the subfolders and the files within this folder, in the “Applies to” drop-down menu, select “This folder, subfolder, and files” option.
- To audit all the actions, click the “Show advanced permission” option in the permissions section to view all the permissions and then select the “Full Control” checkbox. You can also individually turn on/off the options to meet your needs here.
- Click “OK” to apply the configuration changes. This will take you back to the “Advanced Security Settings” window where you will see the newly added audit entry you created.
- Click Apply > Ok in this window and the Apply > ok in the next window to save all changes.
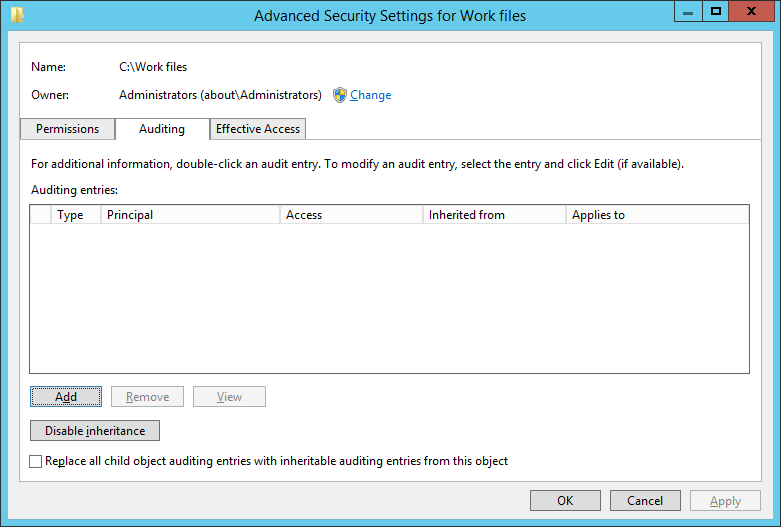
Figure 3: Advanced Security Settings for Work Files Window
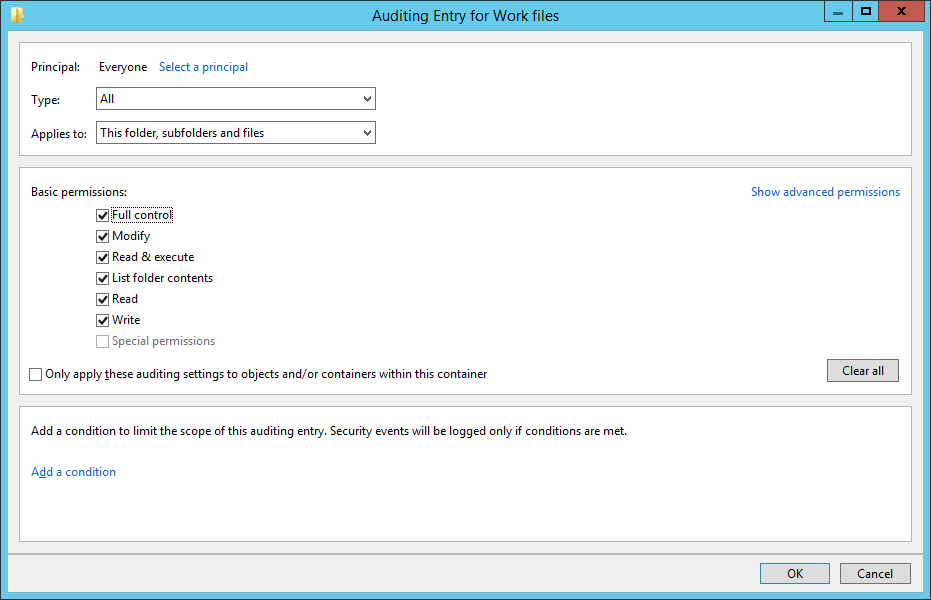
Figure 4: Auditing Entry for Work Files window
Viewing the Audit Log
To view the log of the changes made, open the “Windows Event Viewer” and go to “Windows Logs” > “Security”. In the right pane, you can use the “Filter Current Log” option to find the relevant events. Details of the event will be shown in a new window when an event is selected, like shown in the screenshot below. These event details can be copied / pasted, too, by clicking the “Copy” button in the window.
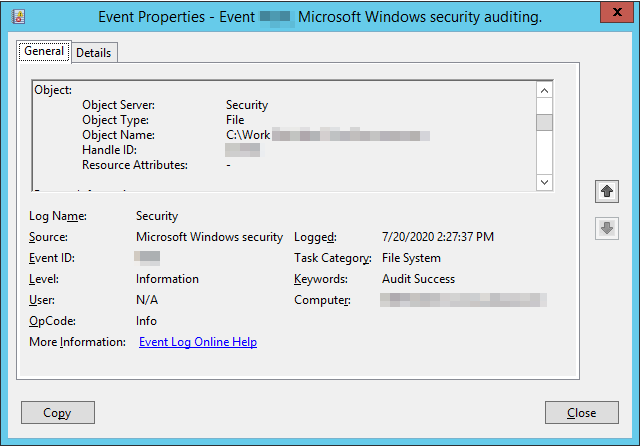
Figure 5: Event Properties window
Conclusion
While the native Windows Server auditing tools will not give the level of configuration, analytics and granularity that other software, such as those mentioned in the beginning of this article, it does provide a relatively quick and easy solution for certain scenarios.
Related posts:
Z Tech Blog
Z Tech is a technologist, senior programme director, business change lead and Agile methodology specialist. He is a former solutions architect, software engineer, infrastructure engineer and cyber security manager. He writes here in his spare time about technology, tech driven business change, how best to adopt Agile practices and cyber security.